
 Home > Articles > Transfer Spotify Music to USB
How to Transfer Spotify Music to USB
Spotify has revolutionized the way we consume music, offering a vast library of songs, podcasts, and audiobooks at our fingertips. With its intuitive interface and the convenience of streaming, it's no wonder that Spotify has become a go-to platform for music lovers worldwide. But what if you want to enjoy your favorite tracks without the need for an internet connection or worry about using up your device's storage? That's where transferring your Spotify music to a USB drive comes in.
Transferring your favorite Spotify tunes to a USB drive is a smart way to enjoy your music without relying on an internet connection or taking up space on your device. Whether you're hitting the road, heading to the gym, or just want to play your playlists on a device that doesn't have Spotify, moving your music to a USB drive is a straightforward process. In this article, we'll walk you through the steps to transfer Spotify music to a USB drive, ensuring you can take your music collection with you wherever you go. So, let's dive in and get your tunes ready for the road!
Ultimate Tool - Playlist Transfer
Want to transfer your music library from Spotify to Apple Music, YouTube Music, Amazon Music, Tidal or more? Playlist Transfer makes it quick and simple.Part 1: Can I Download Spotify Music to USB
As a Spotify Premium subscriber, you have the unique advantage of downloading your favorite music, podcasts, and audiobooks for offline listening. This feature is a boon for those who want to enjoy their tunes without being tethered to the internet. But can you take this convenience a step further by downloading Spotify music directly to a USB drive? Let's delve into the possibilities and limitations.
Spotify Premium is a subscription service that offers a wide array of features, including the option to download music for offline enjoyment. When you download music through Spotify Premium, the files are created for use within the Spotify app. These files are designed to be compatible with the Spotify platform, ensuring they work seamlessly within its ecosystem.
Spotify's commitment to an exceptional listening experience is evident in how it tailors music files for optimal playback within its app. This customization, while enhancing the audio quality, means that the files are not in conventional formats such as MP3 or WAV. Consequently, the downloaded tracks are designed to be played exclusively through the Spotify app, and they cannot be directly moved or played on other devices or media players without Spotify.
For those who do not have a Spotify Premium subscription, the ability to download music for offline listening is not available. Non-Premium users are limited to streaming music with ads and cannot download any content for offline use. This means that without a Premium subscription, you cannot even download music to your device, let alone transfer it to a USB drive.
If you're looking to enjoy your Spotify music on other devices, or if you want to have your music available on a USB drive for use in a car or other non-smart environments, you might consider using a Spotify Music Converter.
Part 2: How to Download Spotify Music to Windows/Mac
Spotify Music Converter
Spotify Music Converter is a sophisticated tool crafted for Spotify aficionados, empowering them to effortlessly download their beloved tracks and convert them into various formats such as MP3, AAC, WAV, FLAC, AIFF, and ALAC. Renowned for its swift conversion process and preservation of pristine audio quality, this application facilitates the transfer of Spotify playlists to a plethora of devices, including iPhones, iPods, MP3 players, PSPs, and even enables the creation of music CDs.
Boasting an uncluttered and straightforward interface, the Spotify Music Converter is a breeze to navigate, offering a seamless experience for both novice and seasoned users. Its capability to handle multiple downloads and conversions simultaneously is a standout feature, significantly enhancing productivity and catering to those with extensive music libraries. Moreover, the converter retains all ID3 tag details post-conversion, such as track names, artist information, and album artwork, streamlining the organization and navigation of one's local music collection.
Step 1 Launch Spotify Music Converter
Start up the Spotify Music Converter application on your computer and Spotify Web Player will pop up.
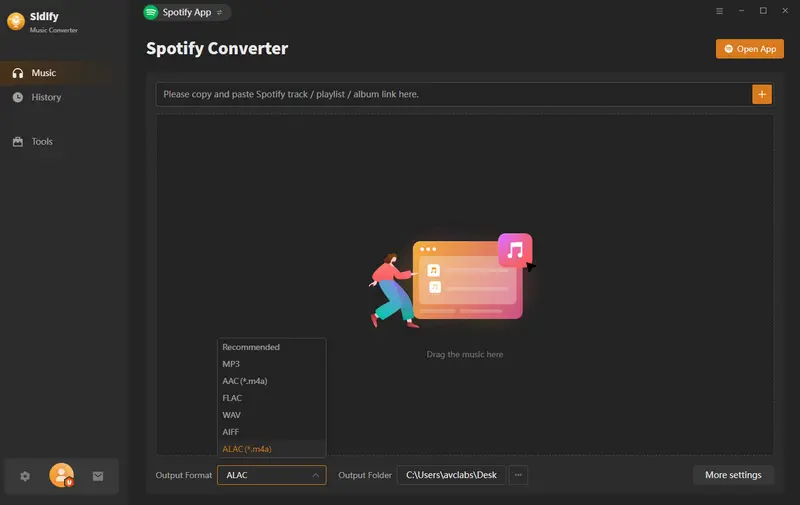
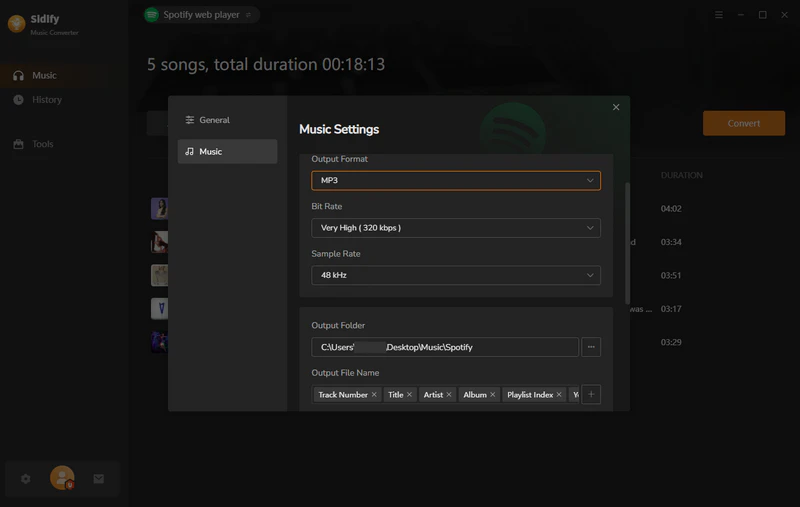
Step 2 Choose MP3 Output Format
Head to the left-hand side of the screen and click on the "Settings" tab to adjust the output format and quality that you want for your audio conversions.
Select the MP3 format from the options provided to set it as your preferred output format.
You also have the option to customize where your converted files will be saved. You can either change the destination folder or let the files be placed in the default location.
For a more personalized look, switch between the dark and light interface modes based on what you find more visually appealing.
Lastly, to make your interaction with the software more intuitive, you can change the language of the program to one that you are most comfortable with.
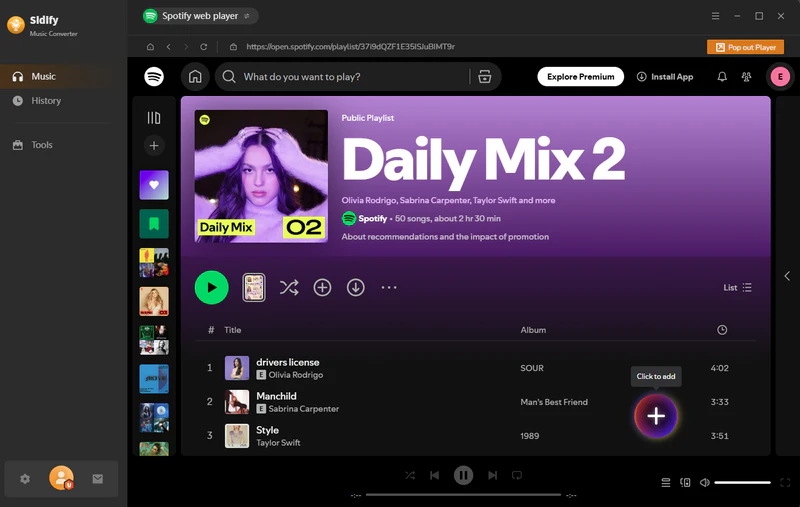
Step 3 Add Spotify playlist to Converter
For a swift conversion, you can easily move tracks from Spotify to the Sidify Music Converter by dragging and dropping them.
Or, if you prefer, you can grab the playlist's URL from Spotify and paste it into the converter. The converter will then recognize the songs and list them in the conversion interface.
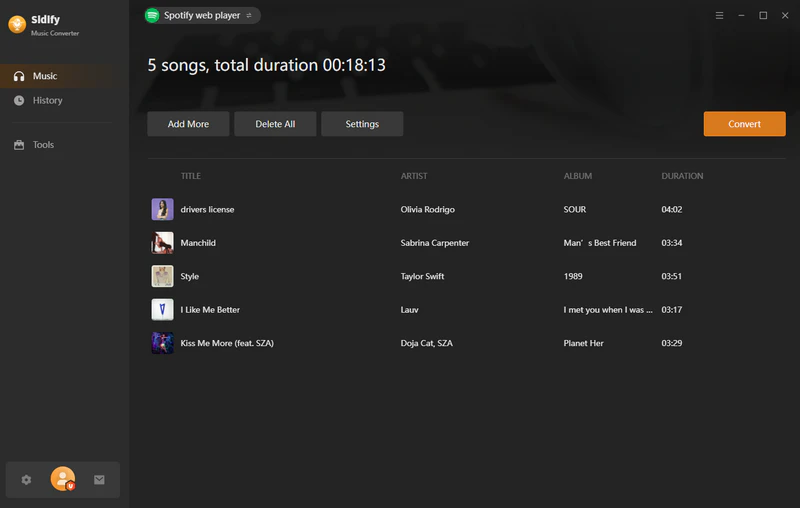
Step 4 Downloading Spotify Playlist
Once you've chosen the playlist, start the conversion process by tapping the "Convert" button.
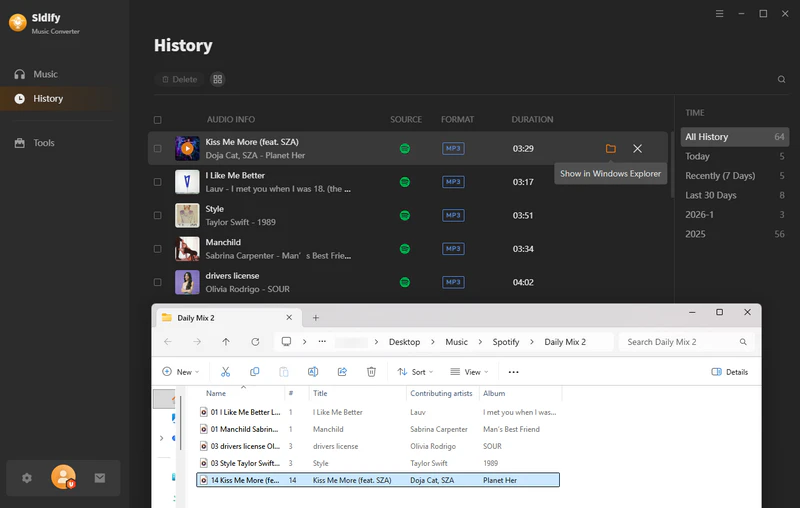
Step 5 Check Spotify Downloads
Upon completion of the conversion, navigate to the "Histroy" section on the sidebar to effortlessly browse and check out your newly converted audio files.
Part 3: How to Transfer Spotify Music to USB
Once you've successfully converted your Spotify music into a format that's compatible with a wide range of devices, the next step is to transfer these files to a USB drive for easy portability and accessibility. Here's a detailed guide on how to do this, tailored for both Windows and Mac users.
Preparing the USB Drive
Format the USB Drive: Ensure your USB drive is formatted to a file system that is compatible with the devices you plan to use it with. FAT32 is a common choice as it is widely supported, but it has a file size limit of 4GB. For larger files, consider using exFAT.
Connect the USB Drive: Plug your USB drive into an available USB port on your computer. It should appear as a removable drive in your computer's file system.
Copying Music Files to the USB Drive
For Windows Users:
1. Open File Explorer: Click on the folder icon on your taskbar or press the Windows key + E to open File Explorer.
2. Locate Your Music Files: Navigate to the folder where your converted Spotify music files are stored.
3. Copy the Music Files: Select the files or folders you want to transfer. You can select multiple files by holding down the Ctrl key while clicking on each file. Once selected, right-click and choose "Copy," or use the keyboard shortcut Ctrl+C.
4. Access Your USB Drive: In File Explorer, locate your USB drive under "This PC" in the left sidebar.
5. Paste the Files: Open the USB drive, right-click in the window, and choose "Paste" (or use the keyboard shortcut Ctrl+V). Wait for the copying process to complete.
For Mac Users:
1. Open Finder: Click on the smiley face icon in your dock to open a new Finder window.
2. Locate Your Music Files: Navigate to the folder containing your converted Spotify music files.
3. Copy the Music Files: Select the files or folders you wish to transfer, then right-click (or control-click) and choose "Copy," or use the keyboard shortcut Command+C.
4. Access Your USB Drive: In the Finder sidebar, find your USB drive listed under "Devices."
5. Paste the Files: Open your USB drive in the Finder sidebar, then drag and drop the copied music files into the USB drive window. Alternatively, you can open the USB drive, click anywhere in the window, and press Command+V to paste the files.
Safely Ejecting the USB Drive
After the files have been successfully copied to your USB drive, it's important to safely eject the drive to prevent data corruption.
For Windows Users:
Eject the USB Drive: In File Explorer, right-click on your USB drive under "This PC" and select "Eject." You can also click the upward arrow icon next to the USB drive in the left sidebar.
For Mac Users:
Eject the USB Drive: In Finder, click the eject icon next to your USB drive under "Devices," or right-click (or control-click) on the USB drive and select "Eject."
Now your USB drive is ready to be used with any compatible device, and you can enjoy your Spotify music on the go! Always ensure to handle your USB drive with care to maintain the integrity of your music files.